Manifest Items/Product Listings
Manifest Items/Product Listings
This section explains how to manage your Manifest Items.
Mobile
Web
Mobile
Overview of Manifest Items
What is a Manifest Item?
Where Do I See My Manifest Items?
To view your Manifest Items:
-
Open the app
-
Tap the three-bar menu in the upper-left
-
Go to Manifest Generator > Manifests
-
Tap on the manifest you want to review
-
You’ll now see a list of all Manifest Items scanned or added into that manifest
Each line is an item you've scanned in order to build your manifest inside your Manifest Group.
- Your Manifest/Products are located inside your Manifests.
- Tap the ☰ Menu > Manifest Generator > Manifest: You can now see any Manifest Items/Product Listings you have created.
Manifest Item - Quick Actions
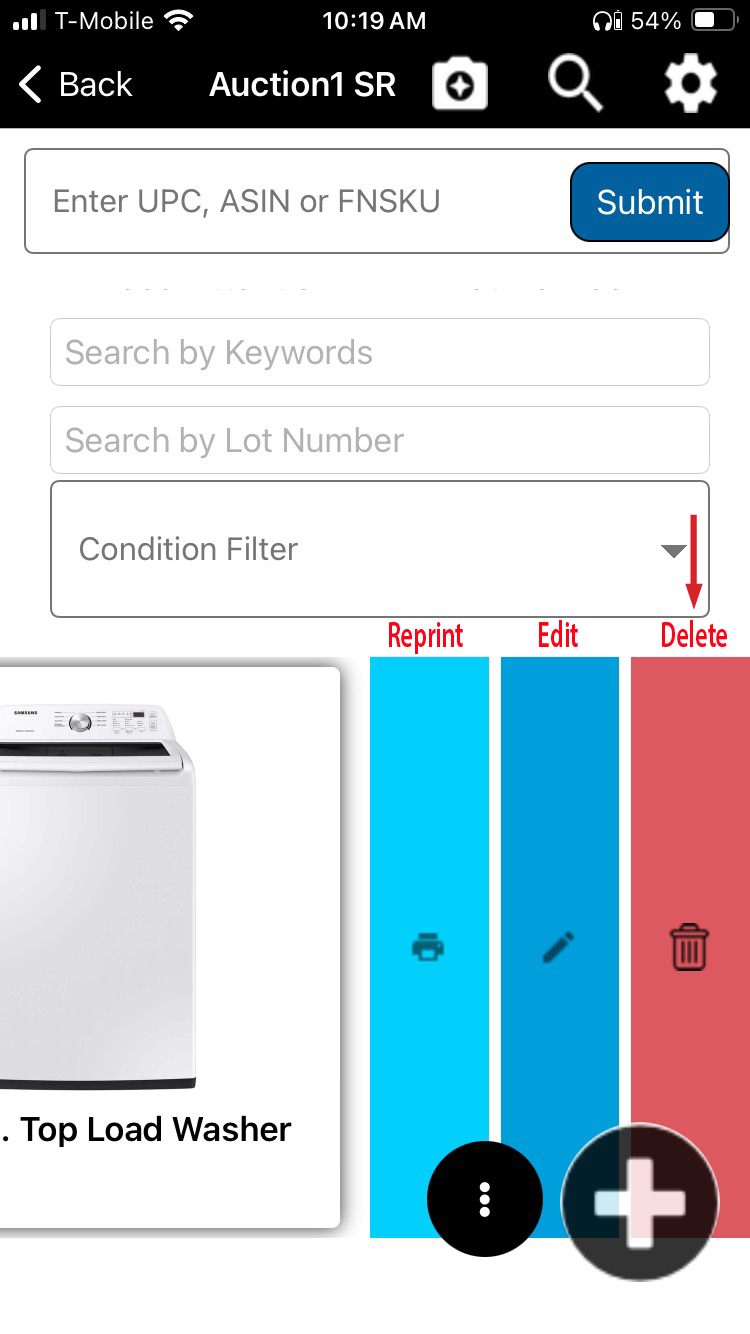
Drag the Thumbnail to the Left or the Right.
Slide Left - Print, Edit, or Delete
Slide thumbnail to the left to Print, Edit, or Delete
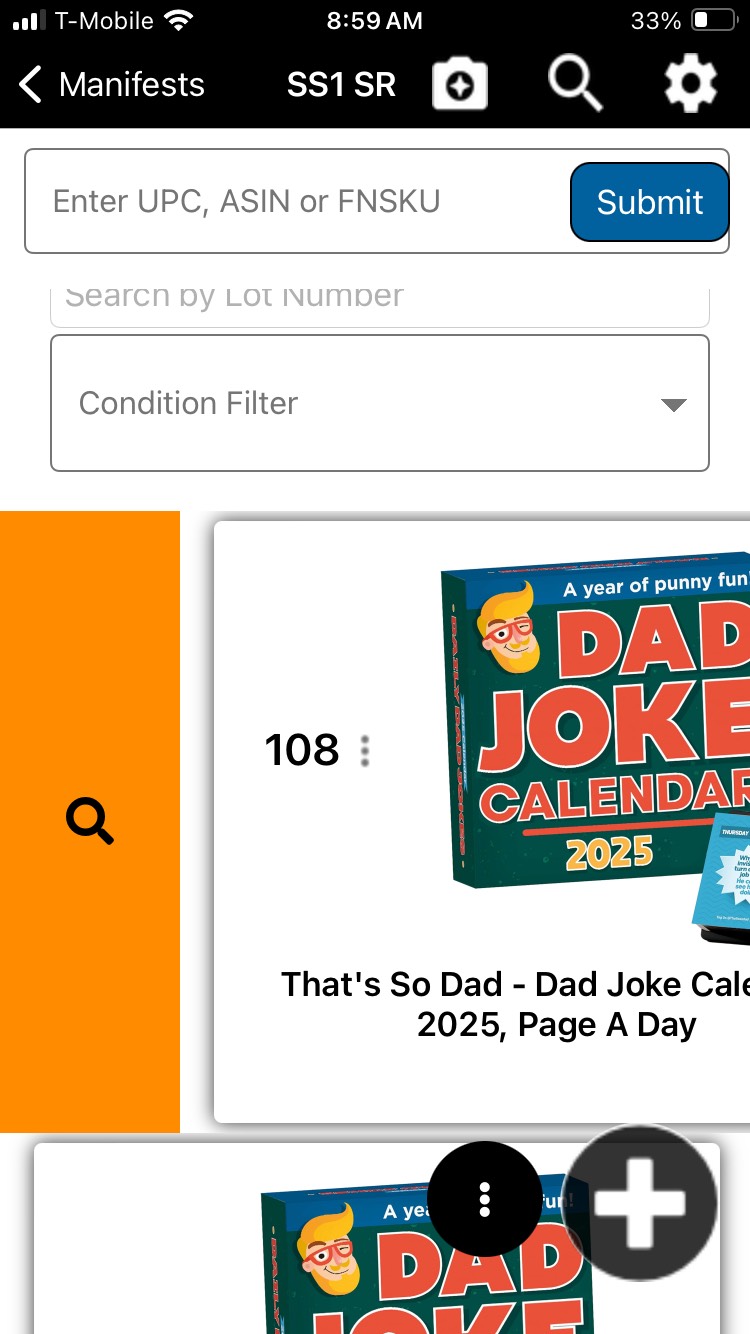
Slide Right - Retry
Slide thumbnail of image to the left and click on the orange magnifying glass.
If you have scanned an item but it has not pulled information you can quickly click the "Retry" option to have manyfastscan find it with the following options: MFS Engine (manyfastscan database), AI Photo Lookup, Share from Retailer
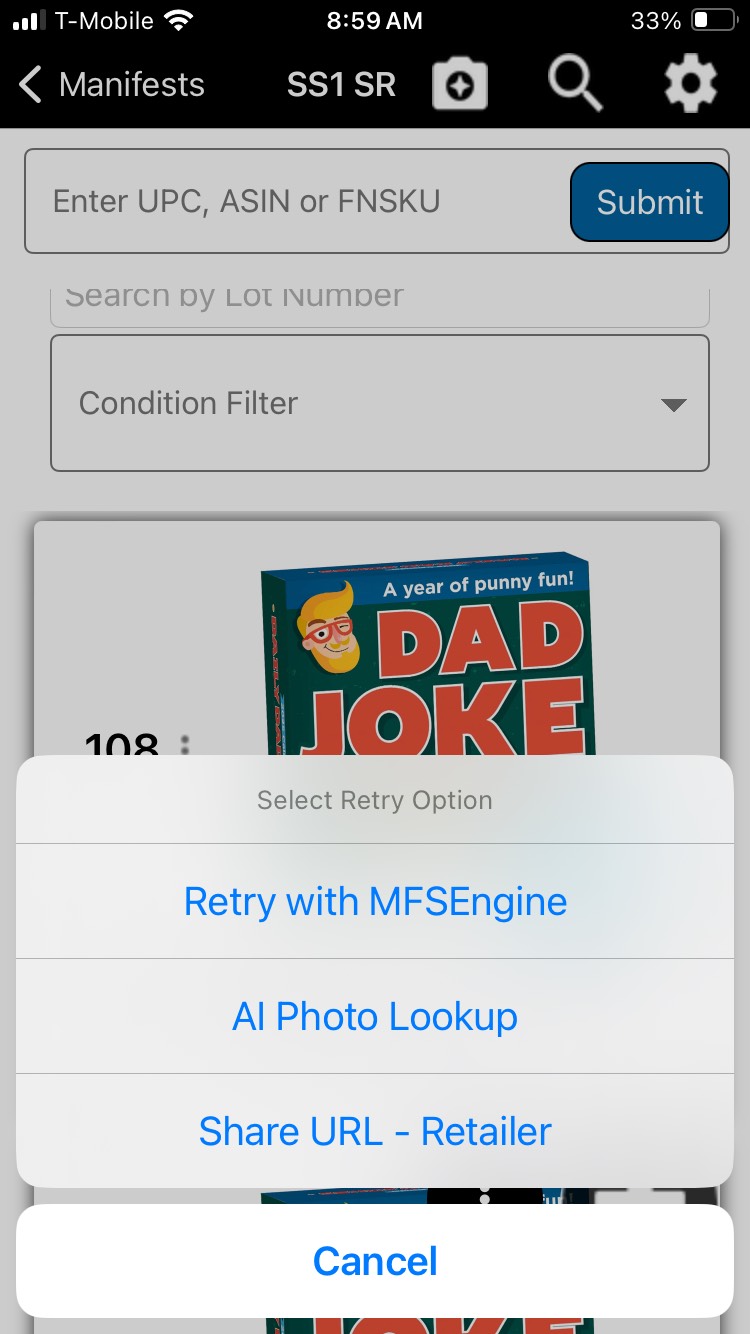
- Retry with MFSEngine: This option will force manyfastscan's internal engine to look for the information again.
- AI Photo Lookup: This option will use our robust "Artificial Intelligence" engine to look for the information again.
- Share URL - Retailer: This option will allow you to open up a retailers app on your mobile device and search for the item, then share it with manyfastscan.
Slide Left - Print, Edit, or Delete Slide thumbnail to the left to Print, Edit, or Delete
|
Slide Right - Retry Slide thumbnail of image to the left and click on the orange magnifying glass. If you have scanned an item but it has not pulled information you can quickly click the "Retry" option to have manyfastscan find it with the following options: MFS Engine (manyfastscan database), AI Photo Lookup, Share from Retailer |
|
|
||
Manifest Item Menu
|
Select the three-dot icon on the Manifest Item
|
Manifest Item Menu appears
|
Edit Manifest Settings
To access the Manifest Settings tap the  icon in the top right of the Manifest screen
Functionality
Addition Mode
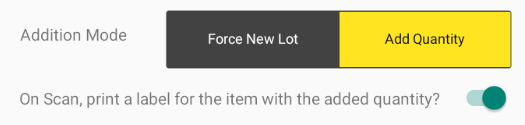
Force New Lot - Every item created on the Manifest will get a Lot# assigned to it
Add Quantity - If an item is created, and the barcode which was scanned or entered already exists in the manifest, quantity will be added to the existing item and the user will be notified. Note - this is only dependent on the scanned barcode, not location or any other attributes. If you have multiple of the same barcode, and the items are in different conditions etc. you may choose not to use this feature
- When Add Quantity is selected, there is an option to print a label with the original Lot #
Thumbnail Display Mode

Stock Images - When selected, the Stock Images compiled by manyfastscan will display in the Manifest
User Generated - When selected, the images captured by the user will display in the Manifest
Lot Increment

This setting allows the user to change the sequencing of lot numbers. By default, this is set to 1 for every Manifest. If there is a need to space out the numbering i.e. starting with Lot# 1, if you set the Lot Increment to '4', then the next lot will be 5, then 9, 13, 17 etc...
The following fields will allow you to select a default value for all items created in the Manifest moving forward.
Vendor Code

This field will set the Vendor Code for all items created moving forward
Default Pickup Location

This field will set the Pickup Location all items created moving forward
Default Condition

This field will set the Condition for all items created moving forward
ZPL Template

This field will set the ZPL Template (label printer template) for all items created moving forward
Buttons
Configure User Lot Ranges

See Configure User Lot Ranges
Reset Vendor Code

When this button is selected, all items on the Manifest will be reset to the Default Vendor Code set above.
Data Settings

This allows the user to change the Data Settings at the Manifest Level.
Note - Data Settings are typically set in the Manifest Group and there is no exceptional reason to change the Data Settings on the Manifest. However, the functionality exists should you need it.
Add Quantity - If an item is created, and the barcode which was scanned or entered already exists in the manifest, quantity will be added to the existing item and the user will be notified. Note - this is only dependent on the scanned barcode, not location or any other attributes. If you have multiple of the same barcode, and the items are in different conditions etc. you may choose not to use this feature
- When Add Quantity is selected, there is an option to print a label with the original Lot #
Stock Images - When selected, the Stock Images compiled by manyfastscan will display in the Manifest
User Generated - When selected, the images captured by the user will display in the Manifest
|
Vendor Code
|
This field will set the Vendor Code for all items created moving forward | |
| Default Pickup Location | This field will set the Pickup Location all items created moving forward | |
| Default Condition | This field will set the Condition for all items created moving forward | |
|
ZPL Template
|
This field will set the ZPL Template (label printer template) for all items created moving forward |
Buttons
| Configure User Lot Ranges |
|
See Configure User Lot Ranges |
| Reset Vendor Code |
|
When this button is selected, all items on the Manifest will be reset to the Default Vendor Code set above. |
| Data Settings |
|
This allows the user to change the Data Settings at the Manifest Level.
Note - Data Settings are typically set in the Manifest Group and there is no exceptional reason to change the Data Settings on the Manifest. However, the functionality exists should you need it.
|
Click  to save any changes made in the Edit Manifest Settings
Edit Manifest Item Details
There are two ways to access your edit item menu.
Method 1. Slide the thumbnail of the image to the left and reveal the Print, Edit, Delete Menu.
Method 2. Click on the 3 Dot menu next to the lot number.
Both menus will lead to an edit item area. Method 1. will allow you to edit the title, description, and details within the lot/listing/item.
As pictured below.
Delete a Manifest Item
Step 1. Choose an Item to Delete
Step 2. Drag the Thumbnail to the left.
Special Note:
This "Drag Menu" allows you to Reprint, Edit, or Delete an item.
WARNING: This action cannot be undone.
Your "Manifest Item" has been deleted.
The functionality to Delete an item can also be accessed in the Manifest Item Menu
Manifest Item Bundles
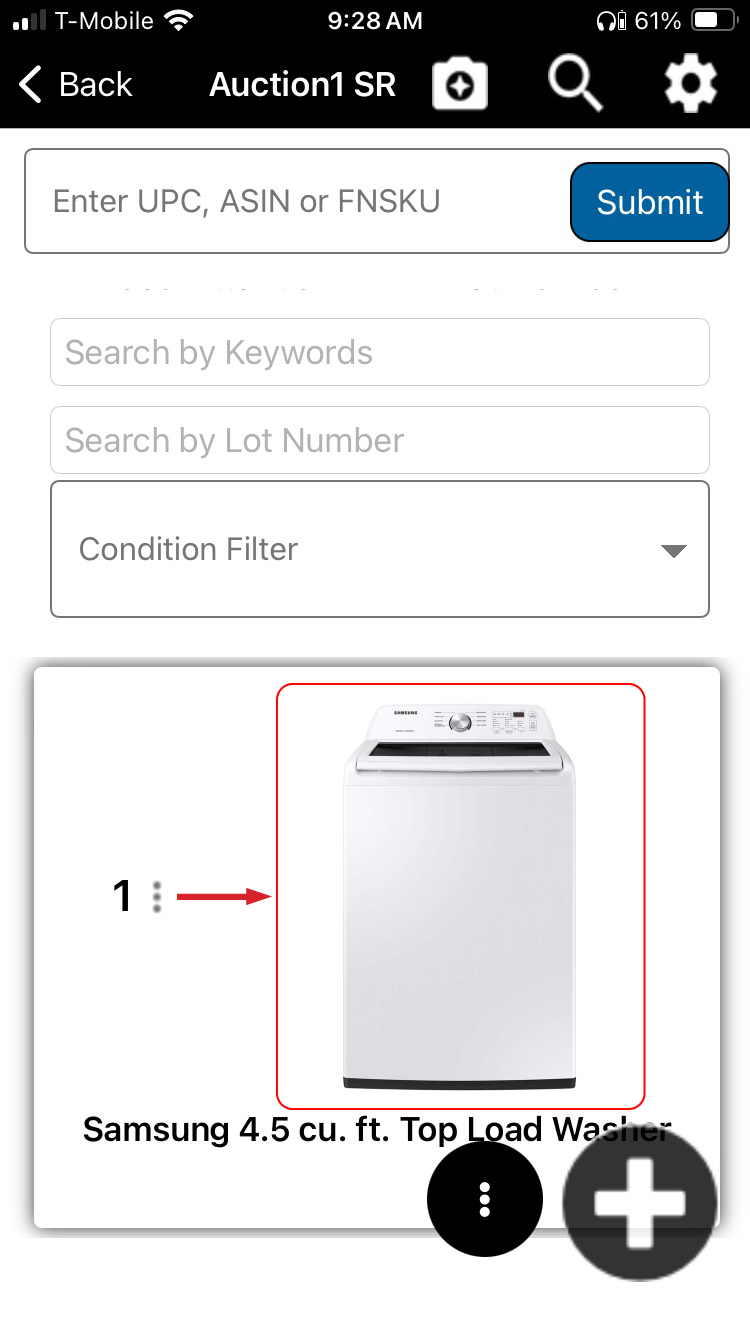
Step 1. Select the 3 Dot Menu in Lower Right.
Special Note:
There are two "3 Dot" Menu's Those next to each lot number, and the 3 Dots in the lower right hand corner next to the "Giant Plus Sign".
Select the 3 Dot Menu in the lower right hand corner, NOT the lot number menu.
Step 2. Click on the "Bundle Box" Icon
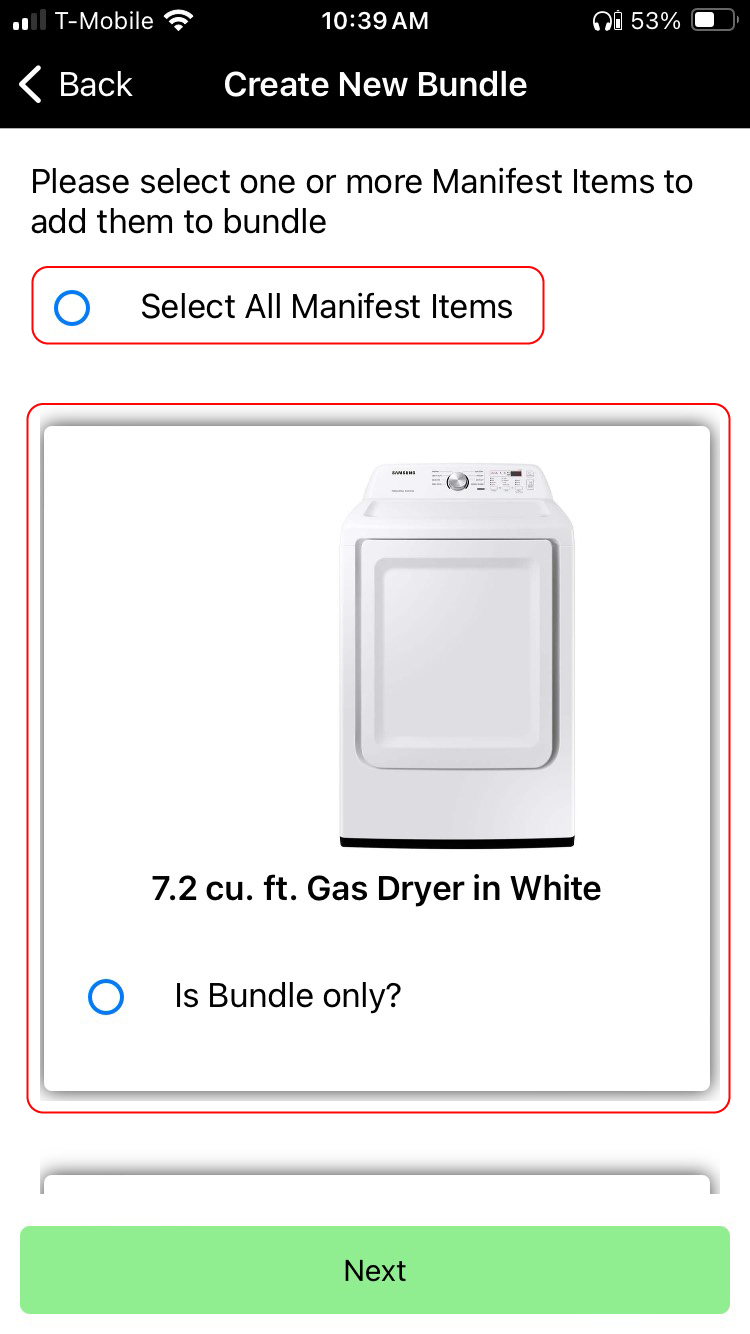
Step 3. Select Which Items to Bundle.
Special Note:
You may select each item individually, or click "Select All" to bundle all of the items currently in your Manifest.
Step 4. Selected Items Have a Yellow Border & A Green Checkmark.
Click the "Next Button" to proceed.
Step 5. Set the Bundles: Lot Number, Section, and Title.
Don't forget to click "Save."
Step 6. Take Photos or Use Stock Images.
Click "Next" to Proceed.
Step 7. Add Details & Set Conditions of Your Bundled Items.
Click the "Save And Print" button to proceed.
Step 8. Your Bundled Items Are Complete.
The barcode and title of each item will be listed in the Description of the Bundle. Retail Prices of the items in the bundle will be added together
Bulk Actions
On your Manifest, if you press and hold a Manifest Item, you will activate the Bulk Action Menu
When the Bulk Action Menu is tapped, the menu to Bulk Delete or Bulk Transfer will appear
Bulk Delete
When Bulk Delete is selected, the user will be prompted to ensure the action was intentional. All items which have been selected - indicated by the yellow background highlight - will be deleted
Bulk Transfer
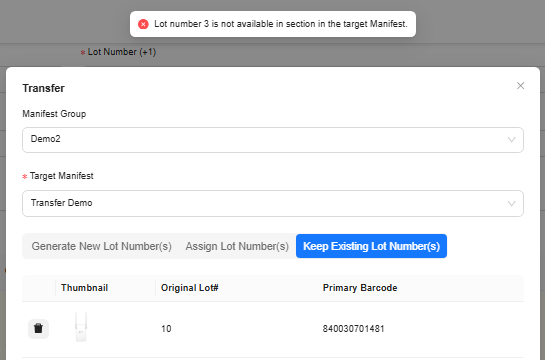
When selecting 'Bulk Transfer' from the Bulk Action Menu, you will be asked to select the Manifest Group and Manifest you want to transfer the item(s) to
When transferring an item to a different manifest, there are three options:
- Generate Lot Number(s)
- Assign Lot Number(s)
- Keep Existing Lot Number(s)
Generate New Lot Number(s)
- manyfastscan will transfer the item and assign the Lot# based on the value in the 'Lot# Starting From' field value.
- If Lot# 1 is not yet used, then the Manifest Item will be transfered and be assigned Lot# 1
- If Lot# 1 is already used in the selected Manifest Group, it will transfer this item and assign Lot#2 or the next available Lot#.
- If Lot# 1-100 are are used, manyfastscan will transfer the item and assign the item Lot #101
Click  to move the item to the selected Manifest

Tip - If you want to transfer an item to another manifest and assign the lowest available Lot#, set the 'Lot# Starting From' field equal to 1
Assign Lot Number(s)
For each item selected in bulk, the user will be able to assign a new lot number to each item.
Click to move the item to the selected Manifest
If the user selects a Lot# which has already been used in the Manifest Group the item is being transferred to, an alert will appear
Keep Existing Lot Number(s)
Click to move the item to the selected Manifest
If the user selects a Lot# which has already been used in the Manifest Group the item is being transferred to, an alert will appear
Web
Overview of Manifest Items
What is a Manifest Item?
Where Do I See My Manifest Items?
To view your Manifest Items:
Open the website
Using the left side menu, go to Manifest Generator > Manifests
Select the manifest you want to review
You’ll now see a list of all Manifest Items scanned or added into that manifest
Manifest Item - Quick Actions
Edit Item 
Edit the Manifest Item Delete Item 
Delete the Manifest Item More Actions 
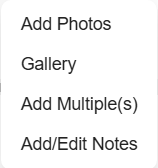
Add Photos - Utilizes the computer's webcam to take photos
Gallery - View Stock Images and User Captured Images
Add Multiple(s) - Allows user to duplicate and item
Add/Edit Notes - Quick access to Item Notes
Add Photos - Utilizes the computer's webcam to take photos
Gallery - View Stock Images and User Captured Images
Add Multiple(s) - Allows user to duplicate and item
Add/Edit Notes - Quick access to Item Notes
Edit Manifest Settings
To access the Manifest Settings select the Manifest Settings  button in the top right of the Manifest screen
Functionality
Addition Mode 
Force New Lot - Every item created on the Manifest will get a Lot# assigned to it
Add Quantity - If an item is created, and the barcode which was scanned or entered already exists in the manifest, quantity will be added to the existing item and the user will be notified. Note - this is only dependent on the scanned barcode, not location or any other attributes. If you have multiple of the same barcode, and the items are in different conditions etc. you may choose not to use this feature
Thumbnail Display Mode
Stock Images - When selected, the Stock Images compiled by manyfastscan will display in the Manifest
User Generated - When selected, the images captured by the user will display in the Manifest Lot Increment 
This setting allows the user to change the sequencing of lot numbers. By default, this is set to 1 for every Manifest. If there is a need to space out the numbering i.e. starting with Lot# 1, if you set the Lot Increment to '4', then the next lot will be 5, then 9, 13, 17 etc...
The following fields will allow you to select a default value for all items created in the Manifest moving forward. Vendor Code

This field will set the Vendor Code for all items created moving forward Default Pickup Location 
This field will set the Pickup Location all items created moving forward Default Condition 
This field will set the Condition for all items created moving forward ZPL Template

This field will set the ZPL Template (label printer template) for all items created moving forward
Buttons
Configure User Lot Ranges
See Configure User Lot Ranges Reset Vendor Code
When this button is selected, all items on the Manifest will be reset to the Default Vendor Code set above.
Add Quantity - If an item is created, and the barcode which was scanned or entered already exists in the manifest, quantity will be added to the existing item and the user will be notified. Note - this is only dependent on the scanned barcode, not location or any other attributes. If you have multiple of the same barcode, and the items are in different conditions etc. you may choose not to use this feature
Stock Images - When selected, the Stock Images compiled by manyfastscan will display in the Manifest
User Generated - When selected, the images captured by the user will display in the Manifest
Vendor Code | This field will set the Vendor Code for all items created moving forward | |
| Default Pickup Location | This field will set the Pickup Location all items created moving forward | |
| Default Condition | This field will set the Condition for all items created moving forward | |
ZPL Template | This field will set the ZPL Template (label printer template) for all items created moving forward |
Buttons
| Configure User Lot Ranges | See Configure User Lot Ranges | |
| Reset Vendor Code | When this button is selected, all items on the Manifest will be reset to the Default Vendor Code set above. |
Click  to save any changes made in the Edit Manifest Settings
Edit Manifest Data Settings
| Data Settings | This allows the user to change the Data Settings at the Manifest Level. Note - Data Settings are typically set in the Manifest Group and there is no exceptional reason to change the Data Settings on the Manifest. However, the functionality exists should you need it. |
Edit Manifest Item Details
Select the  icon for the Manifest Item you want to view/edit
A pop up will appear and will show all fields and data available for the item. The fields in this view can be configured in the View Settings > Edit Item Screen
Delete a Manifest Item
Step 1. Choose an Item to Delete
Step 2. Confirm Deletion
WARNING: This action cannot be undone.
Your "Manifest Item" has been deleted.
Manifest Item Bundles
Step 1. Select the  button in the top Right.
Step 2. Set the Bundles: Lot Number, Section, and Title.
Step 3. Select Which Items to Bundle.
When an item is selected, a field for 'Bundle Only' will be shown and selected by default. If you only have 1 of these items, then you will want to show it in a bundle only. If you have a volume of these items and they are all identical, you can uncheck this box and the item will appear as an individual lot and in the bundle.
Step 4. Click Create 
Step 5. Take Photos or Use Stock Images.
Click  to Proceed to Add Details.
Step 6. Add Details & Set Conditions of Your Bundled Items.
Click  to finish the creation of the Bundle.
Step 7. Bundle is created. The title of the Lot will show as the Title created by the user. The Barcode and Title of each item will display in the Description of the item created
Bulk Actions
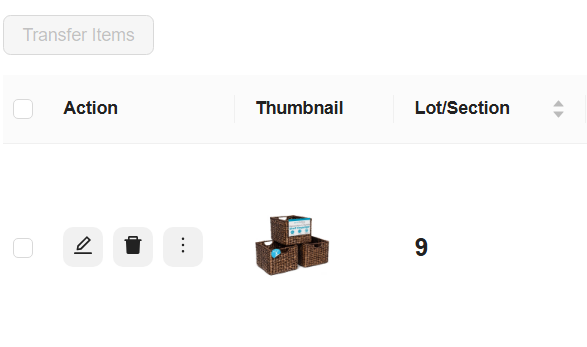
On your Manifest, if you check the box to the left of the Quick Actions for the Manifest Item, you will activate the Bulk Action Buttons. The checkbox in the header row (next to 'Action') will select all items in the Manifest
When checkbox(es) are are selected for one or multiple items, the buttons to Bulk Delete or Bulk Transfer will appear
Bulk Delete
When Bulk Delete is selected, the user will be prompted to ensure the action was intentional. All items which have been selected - indicated by the yellow background highlight - will be deleted
Bulk Transfer
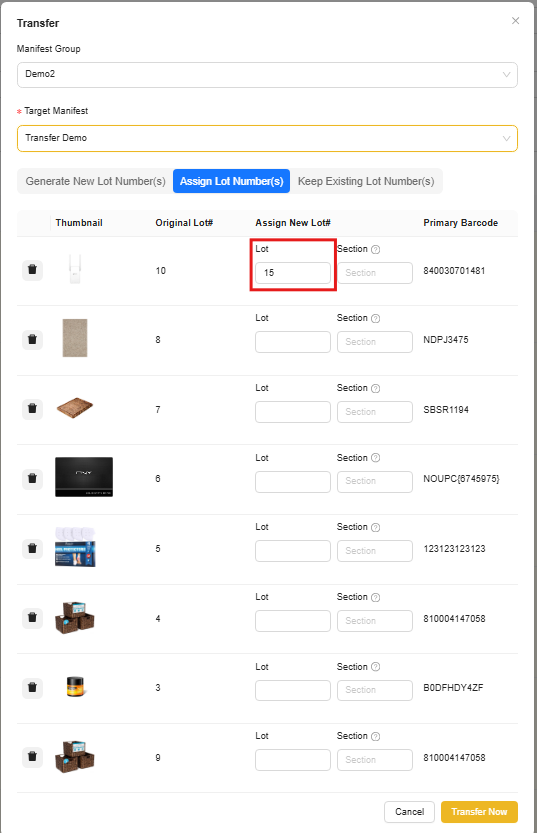
When selecting 'Bulk Transfer' from the Bulk Action Menu, you will be asked to select the Manifest Group and Manifest you want to transfer the item(s) to
When transferring an item to a different manifest, there are three options:
- Generate Lot Number(s)
- Assign Lot Number(s)
- Keep Existing Lot Number(s)
Generate New Lot Number(s)
- manyfastscan will transfer the item and assign the Lot# based on the value in the 'Lot# Starting From' field value.
- If Lot# 1 is not yet used, then the Manifest Item will be transfered and be assigned Lot# 1
- If Lot# 1 is already used in the selected Manifest Group, it will transfer this item and assign Lot#2 or the next available Lot#.
- If Lot# 1-100 are are used, manyfastscan will transfer the item and assign the item Lot #101
Click  to move the item to the selected Manifest
Tip - If you want to transfer an item to another manifest and assign the lowest available Lot#, set the 'Lot# Starting From' field equal to 1
Assign Lot Number(s)
For each item selected in bulk, the user will be able to assign a new lot number to each item.
Click to move the item to the selected Manifest
If the user selects a Lot# which has already been used in the Manifest Group the item is being transferred to, an alert will appear
Keep Existing Lot Number(s)
Click to move the item to the selected Manifest
If the user selects a Lot# which has already been used in the Manifest Group the item is being transferred to, an alert will appear
Related Articles
How to Create Multiple Items
Mobile Web Mobile How to Create Multiple Items Creating multiple items in a manifest is an important shortcut that allows you to list 5, 6, 10, or even 20 (as many as you need) of the same item quickly. You can choose to list them consecutively or ...Catalog For Auction
Catalog For Auction Cataloging means you are creating "Product Listings" for your Auction. These listings are each of your items/product listings. By default your manyfastscan is already setup for Auction format such as Hibid, Liveauctioneers, ...6 Ways to List with manyfastscan
Create a Manifest Group, and a Manifest before you start listing items. There are 6 methods or modes for listing in manyfastscan. UPC Mode – Scan standard UPCs, FNSKUs, and ASINs using your device’s camera. Bluetooth scanners are also compatible (see ...Manifest Item Photo Editor
Manifest Item Photo Editor Features When Creating the Item Photo Editor w/ AI Background Removal Our app includes all the tools you need in order to edit your photo's. Individual & Bulk Removal of Background: Remove backgrounds of all photos at once, ...Editing a manifest group data setting
Edit Manifest Group Data Settings Step 1. Tap the ☰ Menu > Manifest Generator Step 2. Click on Manifest Group This is your Manifest Generator Menu. Click on "Manifest Group" Step 3. Choose the Manifest Group to Edit Click on the "3 Dots" in the upper ...